Check-in App Quick Start Guide
Updated Oct. 16, 2024
Overview
The Eventfinity Check-in App is a user-friendly, efficient, and reliable tool that helps streamline the event check-in process. The app has three components, making it function as three apps in one.
Clients can choose the staff-facing mode where attendees interact with a staff member to facilitate their check-in experience. Attendee-facing mode can be used to allow users a self-check-in at free-standing kiosks. The Eventfinity Kiosk mode is used in conjunction with Bluetooth readers that can scan NFC tags for access control, event sign-ups, and more. No matter the mode, the Eventfinty Check-in App is a great tool to check in quickly with an intuitive interface that guides the user through a seamless process with minimal effort.
Getting Started
- From Event Settings | Event Info on the dashboard, toggle on the ENABLE CHECK-IN APP under ADDITIONAL SETTINGS and save.
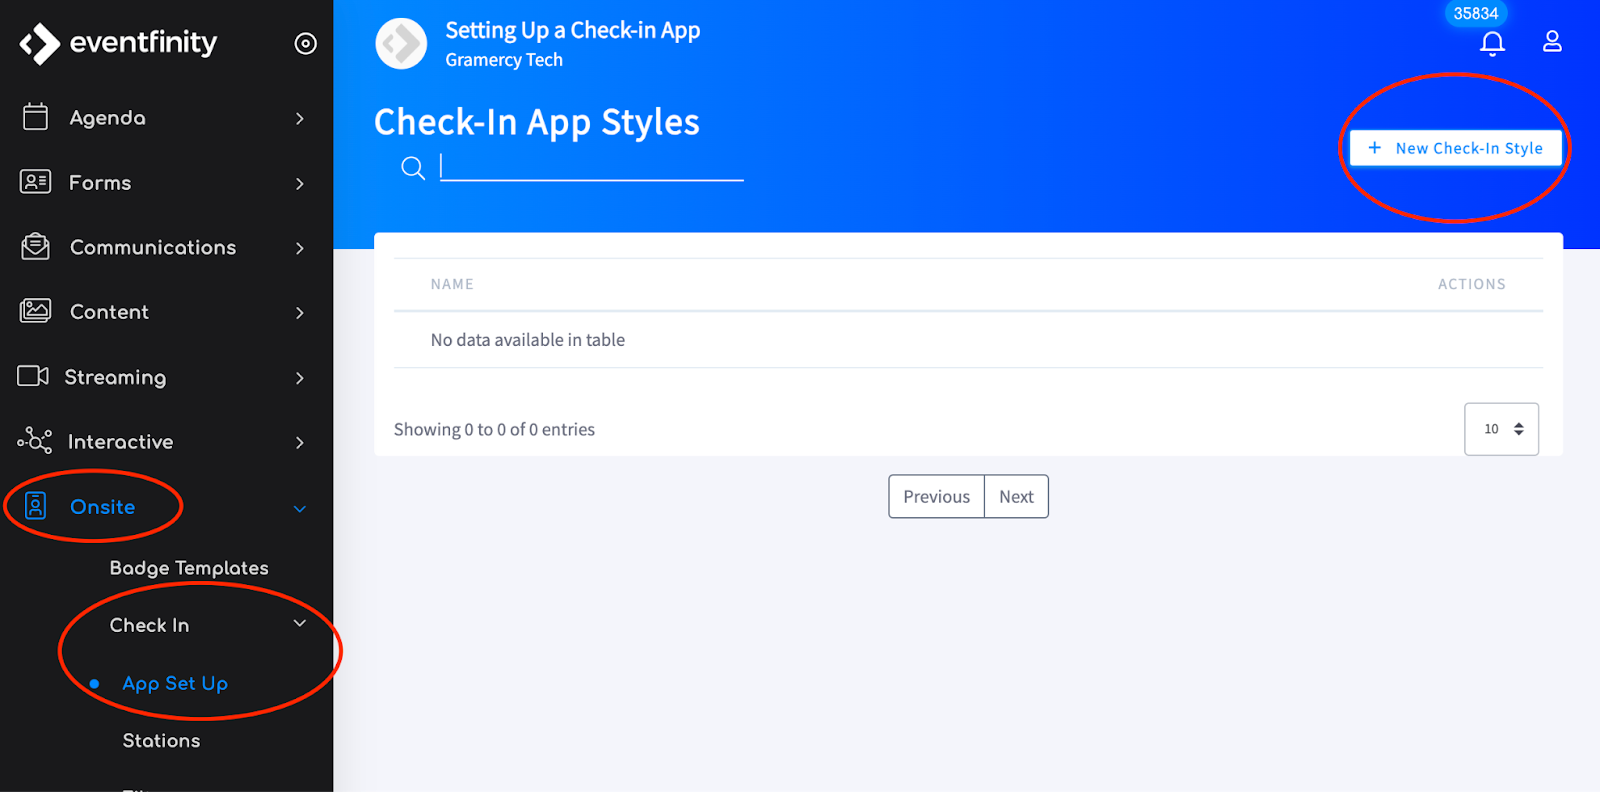
- Scroll down the dashboard menu to Onsite | Check In | App Set Up and create a + New Check-in Style by clicking the button at the top right.

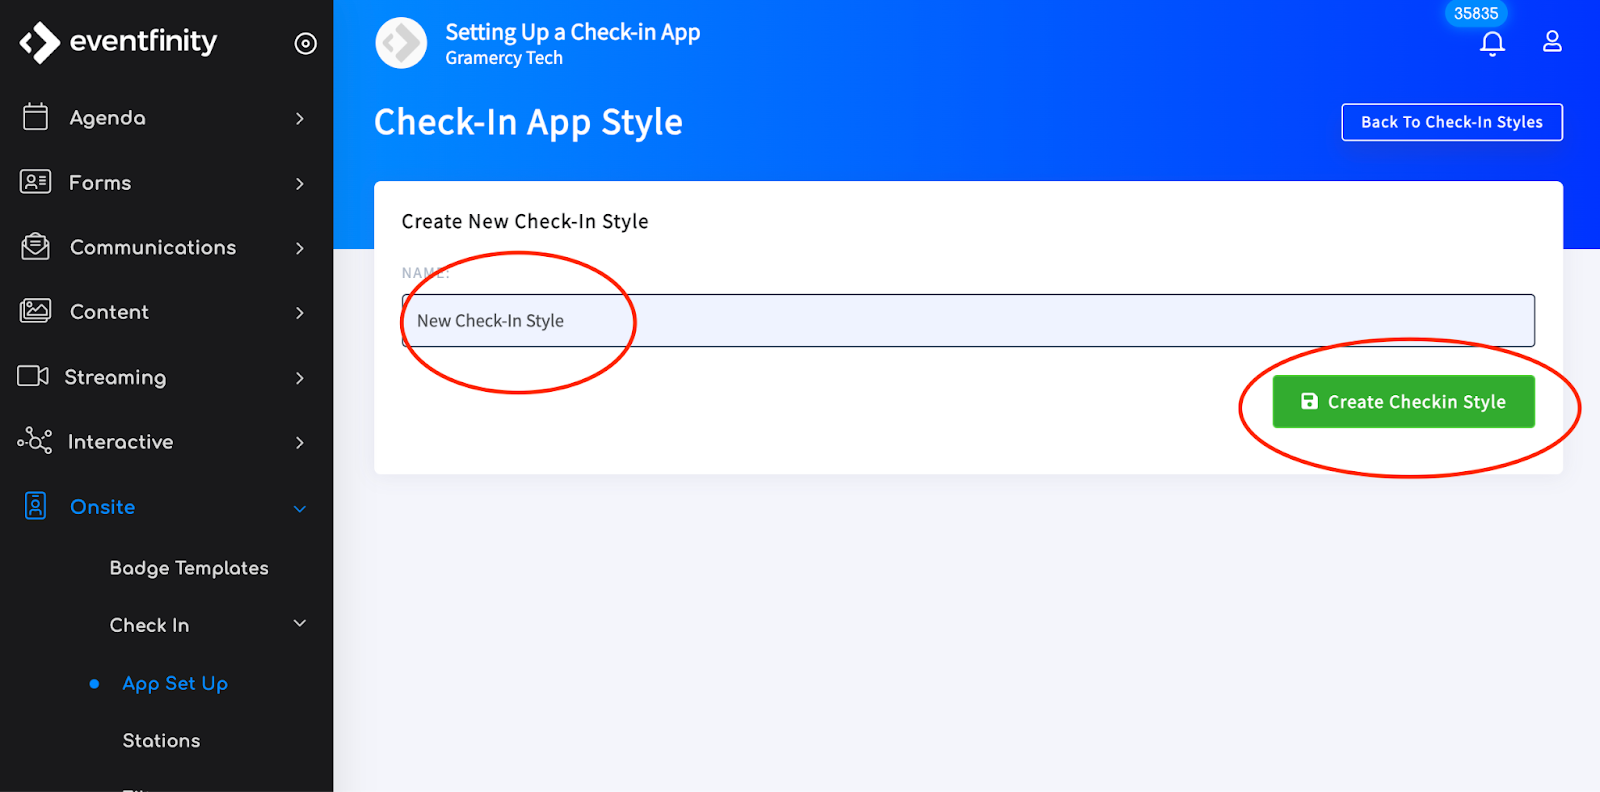
- This will create a new check-in style and open a page where you can add the NAME of your app style and save by clicking Create Create Checkin Style.
Check-In App Set Up
ADMIN SETTINGS
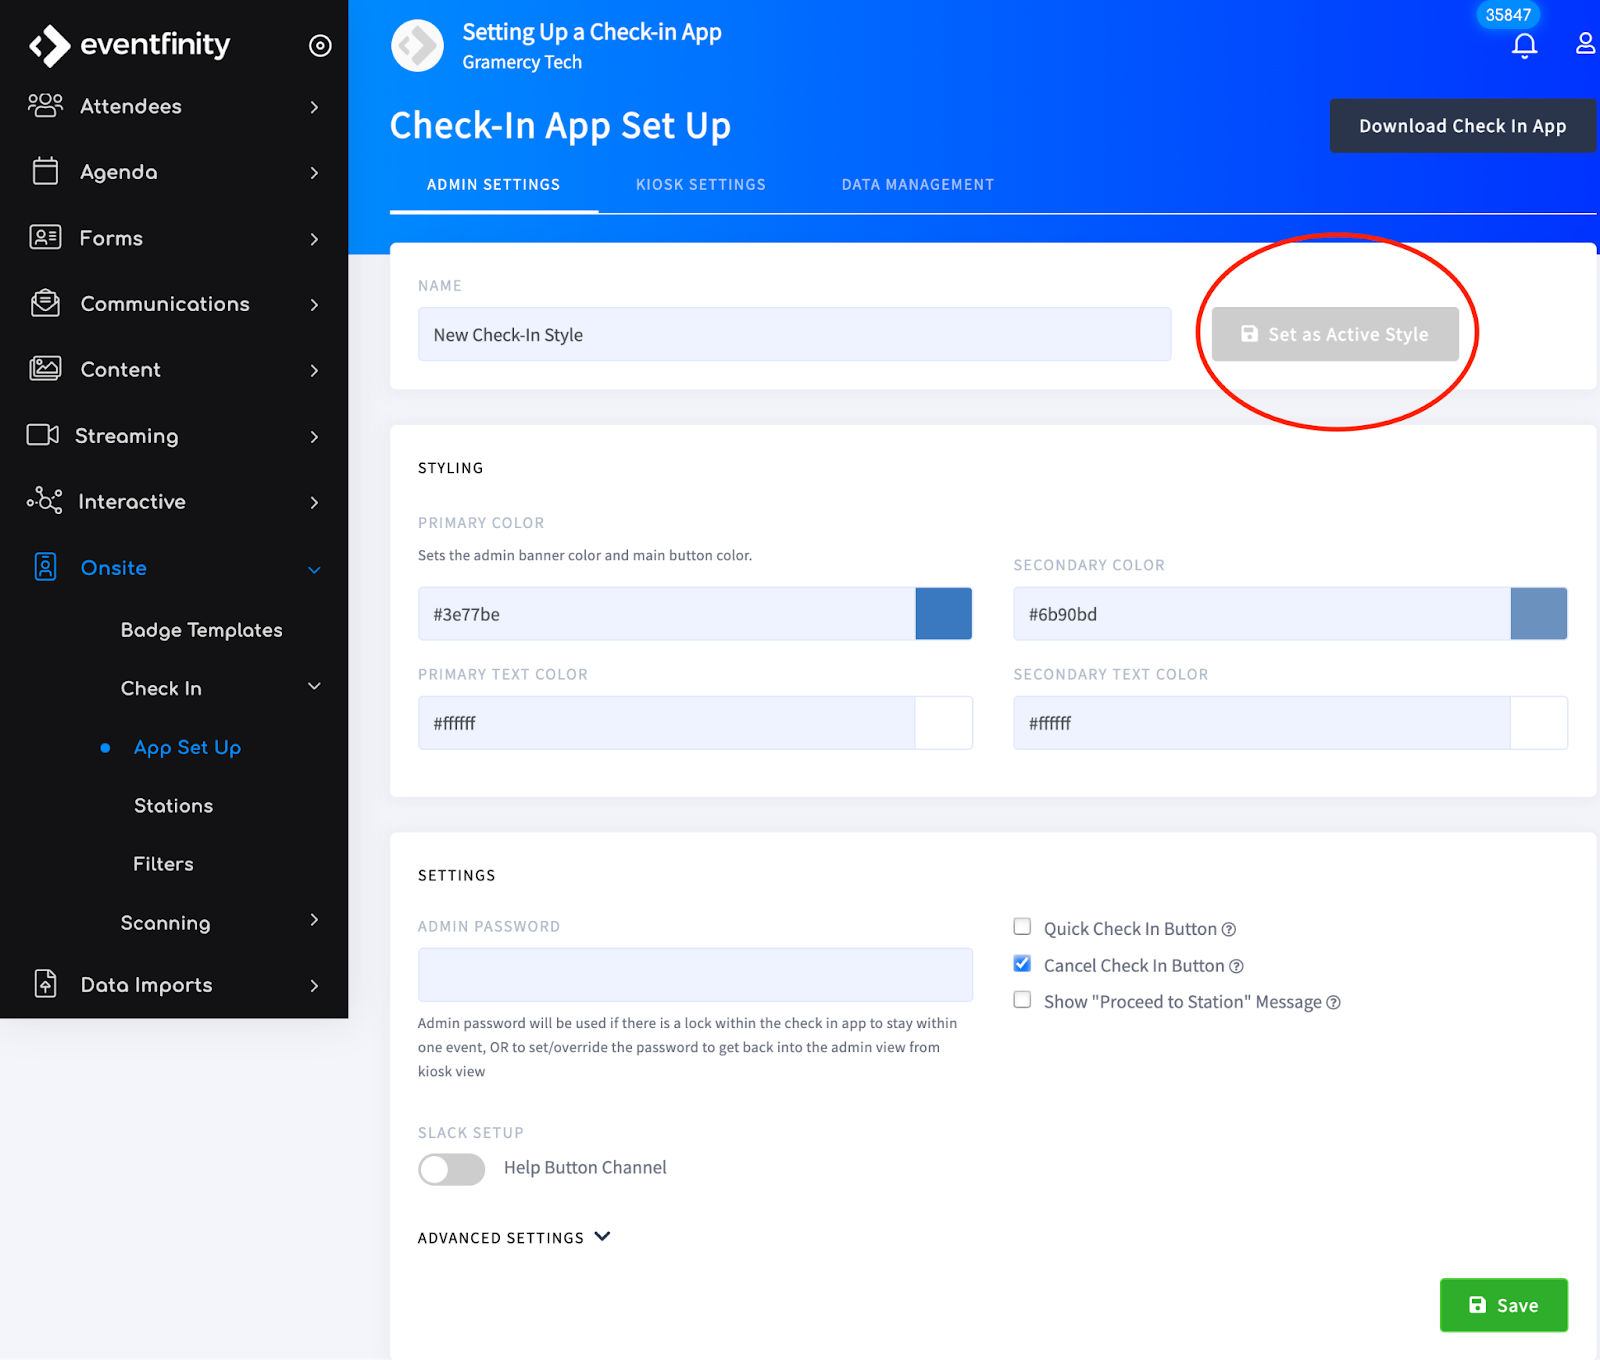
- The App Set Up page has three tabs at the top. The first tab is ADMIN SETTINGS. The first step on this page is to click Set as Active Style.

- STYLING: Once your style is active, you can adjust the color settings (these fields use HEX codes for values):
- PRIMARY COLOR: sets the color of the Check In button in the staff-facing mode, and Back and Survey buttons in the attendee-facing mode
- PRIMARY TEXT COLOR: sets the color of the text on the Check In button, the top navigation bar text as well as the icon colors in staff-facing mode. This color is also used for the Back button text in attendee-facing mode.
- SECONDARY COLOR: sets the color of the Check Out button in staff-facing mode.
- SECONDARY TEXT COLOR: sets the color of the Check Out button text in staff-facing mode.
- SETTINGS: There are a number of optional elements you can add to your check-in app style:
- ADMIN PASSWORD: enter a password here to set a password that can be used if there is a need to lock down the app to stay within one event, or to set/override the password to get back into the admin view from the attendee-facing view.
- Quick Check In Button: enables a check-in button on the search page in staff-facing mode.
- Cancel Check In Button: enables a user to change the status from Checked In to Not Checked In
- Show “Proceed to Station” Message: for attendee-facing mode, this can be used if badging stations are set up for the event
- ADVANCED SETTINGS:
- Allow Tag Association: when checked allows you to pair an NFC tag with an attendee
- Allow New Tag Creation: when checked, this ingests the new tags in the event. This is for events with NFC tags that are associated with an attendee prior to the opening of the event registration.
- Required NDEF Value for Beacons: when checked, the scan will look for the information set in the BEACON NDEF REGEX
- Enable Device NFC Scanner: when checked this will enable an iPhone NFC scanner
- BEACON NDEF REGEX: insert the NDEF REGEX code if required here
- BEACON UUID REGEX: insert the UUID REGEX code if required here
KIOSK SETTINGS
This tab is where you set up the attendee-facing mode for self-serve check-in. If your event is not using this mode, you can skip this setup and proceed to step eight.
- Under GRAPHICS, begin by setting your event BANNER GRAPHIC with an image that is under 1 MB and has pixel dimensions of 1536 W x 360 H.
- Upload your event SPLASH SCREEN GRAPHIC with an image that is under 1 MB and has pixel dimensions of 1536 W x 2048 H.
- Under KIOSK SETTINGS set your KIOSK SPLASH BUTTON BACKGROUND and TEXT COLOR.
- Enable your buttons by toggling on the ENABLE STANDARD CHECK-IN BUTTON or ENABLE QR CODE SCANNING BUTTON and customizing the button labels if desired.
- BARCODE REGEX: If you are using a barcode regex to parse out complex barcodes or QR code strings, enter the expression here.
- Set the KIOSK IDLE STATE AUTO-DISMISS TIMER - this sets the length of time of inactivity in attendee-facing mode before returning to the splash screen.
- Search - Live Results When Typing - when checked, search results show as the attendee types. Not recommended for events with a huge database of attendees.
- Take Attendee Photos - when checked, allows attendees to take photos in attendee-facing mode.
- Allow Multiple Check-ins - when checked, this enables multiple check-ins.
- Under BADGE PRINTING, Enable Badge Printing from Kiosk - when checked, this is used in conjunction with badging stations where the attendee badge is printed after a successful check-in.
- Show Badge Preview on Kiosk - when checked, the attendee will see a preview of their badge in the attendee-facing mode.
- Once your settings are complete, click the green Save button.
Additional Optional Attendee-Facing Kiosk Pages
- TERMS & CONDITIONS PAGE
Check this box if a terms and conditions agreement is required for attendees to customize the:- PAGE TITLE
- CONTENT TEXT (Can be styled with HTML)
- AGREE BUTTON TEXT and COLORS
- ATTENDEE SEARCH and ATTENDEE EDIT PAGES
These sections allow changes to the TITLE, SUBTITLE, and BACK button text on the corresponding page. - CHECK-IN SUCCESS PAGE
This section allows you to change the Thank you page’s title, and message body using custom HTML. The label of the finish button can also be changed here. - KIOSK SURVEYS
This section allows you to include pre-and post-check-in surveys. When a survey is enabled you can edit the Survey Title, Subtitle, and Fields.
DATA MANAGEMENT
The final phase of setting up your Check-in App style is done in the DATA MANAGEMENT tab which is made up of three individual sections.
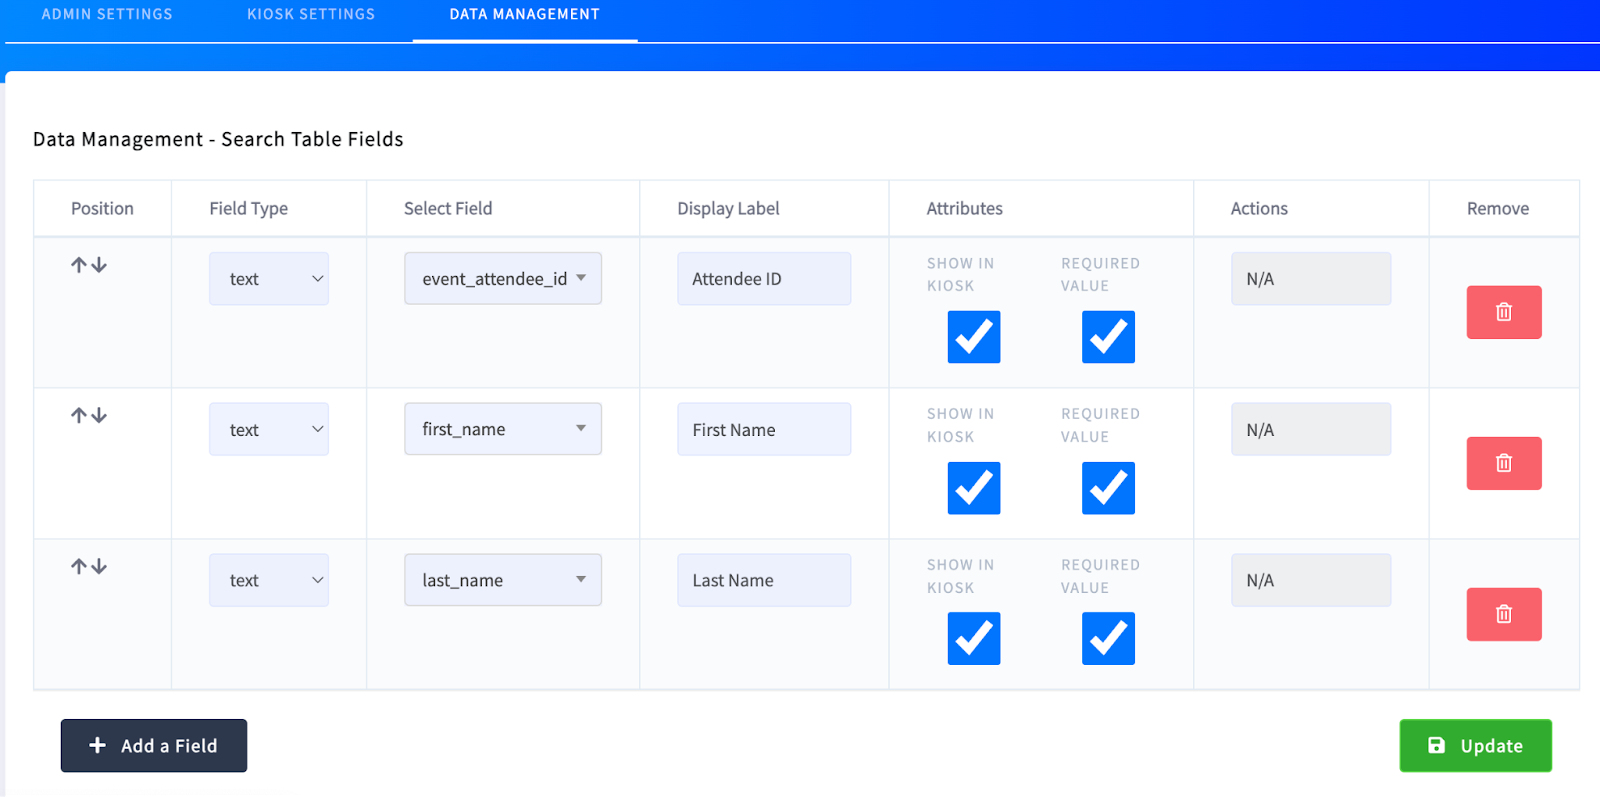
- Search Table Fields: This section contains the information shown when an attendee is searched in both the attendee- and staff-facing modes. Additional fields can be added by clicking the + Add a Field button.
The number of fields is limited to 11. Each field is searchable, but only the first 5 in the list will show in the staff-facing mode. - Profile Page: This section contains the information shown when an attendee is selected from a search result in both the attendee-facing and staff-facing modes.
The profile can display up to 50 different attendee fields. - Create Attendee Fields: This section contains the information shown when an attendee is added to an event in the attendee-facing mode.
The Create Attendee Fields can display up to 50 different attendee fields.
Actions include:
- POSITION: using the ↑ ↓ icons, the data row can be adjusted to set the column headings in the staff-facing mode and the order in which the fields are returned in the attendee-facing mode and when creating a new attendee.
- FIELD TYPE: select from text, dropdown, radio, checkbox, or image.
- SELECT FIELD: choose the field you wish to display from the ATTENDEE FIELDS under Attendees | Attendee Settings dashboard section.
- DISPLAY LABEL: type the label for the selected display.
- ATTRIBUTES: choices include:
- SHOW IN KIOSK - will show in both staff- and attendee-facing modes
- REQUIRED VALUE - check if this value is required to be populated prior to checking in
- EDITABLE - check if the field can be edited in staff-facing mode
- EDITABLE IN KIOSK - check if the field can be edited in attendee-facing mode
Wrapping Up
Once you have your Check-In App style setup it is time to review it in the actual app. To aid in this review, below is a common checklist for your Check-In App style. This checklist is meant to be a general guideline for both modes. Always test all requirements specific for your event.
- Visit the Apple App Store on an iPad or iPhone. (Note: Attendee Facing mode is not supported on iPhone)
- Log in to the app and open your event.
- Check for colors, graphics, and icons
- Validate all search fields are correct
- Test search
- If using QR codes - scan a test QR code using one of the search field values
- If using RFID to pair a tag, connect a reader and test
- If printing badges, connect a printer and test


