Using ticket views
Views are a way to group tickets based on certain criteria. You can access your views list and open any view to see the tickets associated with that view.
You can use or modify the default views, as well as create your own custom views (see Using views to manage ticket workflow).
Opening a view
Views are displayed as a list in the Views pane. The first 12 of your shared views and 8 of your personal views appear in the list. If you have additional views, you can access them by clicking More at the bottom of the list. To change the order views appear in, see Reordering views.
- Click the Views icon () in the sidebar, then select a view from the list.
 ) in the sidebar, then select a view from the list.
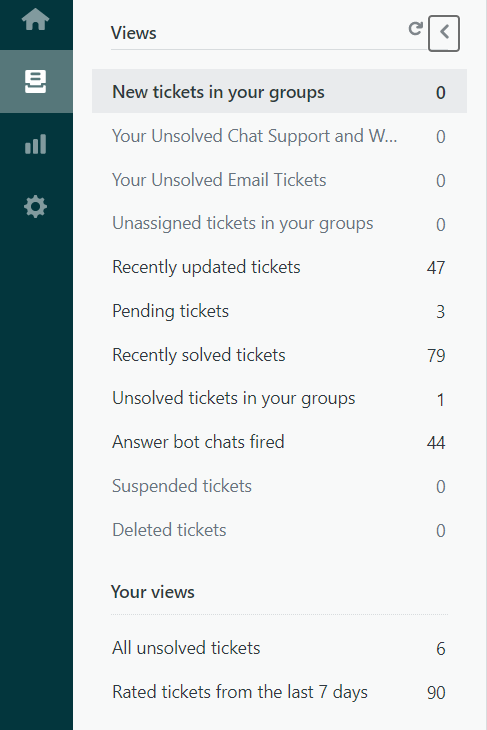
About view types
Zendesk Support includes the following types of views:
- Default views. There are a number of pre-defined views created when you open a Zendesk Support account. You can deactivate or edit most of these views; however, the Suspended tickets and Deleted tickets views cannot be edited or removed from your list of views.
- Shared views. Administrators can create views that are available to all agents or to all agents in a specific group. The first 12 shared views are accessible in the Views list () .
- Personal views. Agents can create views that available to themselves only. The first 8 personal views are accessible in the Views list ().
Adding views
Agents can create views for their own personal use. For agents in custom roles, views permissions depend on their custom role setting. Administrators can create personal views, as well as shared views for use by multiple agents.
Community tip! Graeme shares real-world best practices for setting up and using views in this community tip, Views best practices.
- Click the Admin icon () in the sidebar, then select Manage > Views.
- Click Add view.
Alternatively, you can clone a view to create a new view based on an existing view (see Cloning a view). Agents in custom roles might not have the option to add a view, depending on their permissions setting.
- At the top of the page, enter a name for the view.
- Enter a Description for your view.
- Select an availability option to determine Who has accessto the view:
- Any agent, available to all agents.
- Agents in specific groups, available only to agents in the groups specified. You can enter one or more groups in this field. If you enter mulitple tags, hit Enter between each tag.
- Only you, available only to you as a personal view.
- Under Tickets must meet all of these conditions to appear in the view, add the conditions to define this collection of tickets (see Building view condition statementsbelow).
You can also add conditions under Tickets can meet any of these conditions to appear in the view.
- Click Preview to test the conditions.
- Set the formatting options:
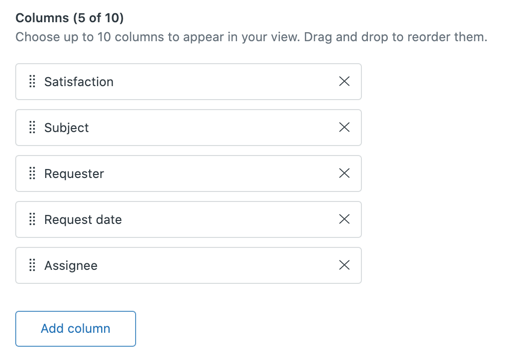
- Drag the view Columns into the order you want. Click Add columnto add up to 10 columns.
Status is always shown in the view before the columns. You don't have to add it manually to the table. Multi-select fields are not supported in table columns.
- Under Group by, select the ticket data field you want to group the tickets in the view, then select Ascending or Descending.Tip: If you select Request date from the Group by dropdown list, any settings you change in the Order by dropdown list will not be applied.
- Under Order by, select the ticket data field you want to use as the default data to order the tickets in the view, then select Ascending or Descending.
- Drag the view Columns into the order you want. Click Add columnto add up to 10 columns.
- When you are finished, click Save.
The view is created.

You can manage your view (edit, deactivate, and so on) on the individual view's page, accessed from the Views management page. See Managing your views.
The view opens and displays the associated tickets.
Building view condition statements
As with the other business rules, you select collections of tickets using conditions, operators, and values.
You must have at least one of the following ticket properties in the Meet all of the following conditions section:
- Status
- Type
- Group
- Assignee
- Requester
Some conditions may not be available, depending on your plan.
| Condition | Description |
|---|---|
| Ticket: Status |
The ticket status values are: New is the initial status of a newly created ticket (not assigned to an agent). Open means that the ticket has been assigned to an agent. Pending is used to indicate that the requester has been asked for information and the ticket is therefore on hold until that information has been received. On-hold means that the support request is awaiting a resolution from a third party—someone who is not a member of your support staff and does not have an agent account in your Zendesk. This status is optional and must be added to your Zendesk (see Adding on-hold ticket status to your Zendesk). Solved indicates that the customer’s issue has been resolved. Tickets remain solved until they are closed. Closed means that the ticket has been locked and cannot be reopened or updated. When selecting a status, you can use the field operators Less Than and Greater Than to specify a range of tickets based on their status. New is the lowest value, with values increasing until you get to Closed status. For example, a condition statement that returns only New, Open, and Pending tickets looks like this: Status is less than Solved. |
| Ticket: Form | Select the required ticket form. For more information on ticket forms, see Creating ticket forms to support multiple request types. |
| Ticket: Type |
The ticket type values are: Question Incident is used to indicate that there is more than one occurrence of the same problem. When this occurs, one ticket is set to Problem and the other tickets that are reporting the same problem are set to Incident and linked to the problem ticket. Problem is a support issue that needs to be resolved. Task is used by the support agents to track various tasks. |
| Ticket: Priority |
There are four values for priority: Low, Normal, High, and Urgent. As with status, you can use the field operators to select tickets that span different priority settings. For example, this statement returns all tickets that are not urgent: Priority is less than Urgent |
| Ticket: Group | The ticket group values are:
Group name is the actual name of the group that is assigned to the ticket. |
| Ticket: Assignee |
The assignee values are:
Additional value for views:
|
| Ticket: Requester |
The requester values are:
Additional value for views:
|
| Ticket: Organization |
The organization values are:
|
| Ticket: Tags | You use this condition to determine if tickets contain a specific tag or tags. You can include or exclude tags in the condition statement by using the operators Contains at least one of the following or Contains none of the following. More than one tag can be added. Press Enter between each tag you add. |
| Ticket: Description | The description is the first comment in the ticket. It does not include the text from the subject line of the ticket. If you are using the Contains at least one of the following or Contains none of the following operators, the results will consider words containing part of the entered search terms. For example, using "none" for this condition will return (or exclude) ticket descriptions containing "nonetheless". The description condition also pulls data contained within the HTML and the original source of a ticket. |
| Ticket: Channel |
The ticket channel is where and how the ticket was created. The contents of this list will differ depending on the channels you have active, and any integrations you are using. For more information about the channels you can configure, see About Zendesk Support channels. For a list of the available ticket channels, see How are ticket channels defined across Zendesk? |
| Ticket: Received at | This condition checks the email address from which the ticket was received. The ticket can be received from a Zendesk email domain such as sales@mondocam.zendesk.com, or from an external email domain such as support@acmejetengines.com. The external email domain must be set up as described in Forwarding your incoming support email to Zendesk or the condition won't work. |
| Ticket: Satisfaction | This condition returns the following customer satisfaction rating values:
|
| Hours since... | This condition allows you to select tickets based on the hours that have passed since the ticket was updated in the following ways:
|
| Ticket: Custom fields | Custom fields that set tags (drop-down list and checkbox) are available as conditions. You can select the drop-down list values and Yes or No for checkboxes. The following field types aren't available as view conditions: Text, Multi-line, Numeric, Decimal, Credit Card, Regex.
Note: Each custom checkbox field must have an associated tag. Otherwise, when you create or edit a view, it won't appear as an available condition. |
| Ticket sharing: Sent to | Checks whether a ticket was shared to another Zendesk Support account via a specific ticket sharing agreement |
| Ticket sharing: Received from | Checks whether a ticket was shared from another Zendesk Support account via a specific ticket sharing agreement |
Cloning a view
You can clone an existing view to create a copy that you can modify and use for some other purpose. You can clone a view from the Views admin page or from the views list.
If using custom roles, agents will need to be permitted to add and edit personal, group, and global views (see Creating custom agent roles). Agents will receive an error message if not given the permission.
To clone a view from the Views admin page
- Click the Admin icon () in the sidebar, then select Manage > Views.
- Hover your mouse over the view you want to clone, then click the options menu () and select Clone view.
- Modify the title, conditions, formatting, and availability as needed.
- Click Save.